1. Before Started
-
Check the packaging box carefully before open the packaging, see if there are any transport damages
-
Check the carton outside label to find out the location of the shutters.
-
Do not dispose of packaging until shutters are operating appropriately.
-
Find working space to assemble you frame (preferably in front of the window).
-
Carefully remove panels and frames from the packaging, check the packaging label (with RED plastic label) to find out the location of following hardware.
-
Do not mix panels or frames from other windows.
2. Getting Started
Each side of your frame kit will be labeled as top, bottom, left or right on the frame cutting side. Lay the frame out on the floor face up.
Position the corners of the frame on a flat surface and line up the Hoffman key. The Hoffman key will hold the two corners together and is inserted with the rounded side facing up and the flat side level with the back of the frame.
3. T-Post
If your frame kit has a T Post the top and bottom will be labelled. Line up the pre drilled holes with the top and bottom of the frame and secure with screws provided.
4. Installing the Frame
Position the assembled frame evenly around the inside of the window frame and secure with the screw into the upper left hand frame only. Once the left side is secured, level the frame inside the window and secure with a screw into the upper right hand side.
5. Installing the Panels
-
Place the panels in the frame one by one and insert hinge pins into the hinges.
-
The hinges on the shutter panel can be adjusted slightly up or down if required.
-
Place all panels in the closed position inside the shutter frame.
-
Once your panels have been positioned and secured with the hinge pins, make sure your panels are even across the bottom. If the panels do not line up shift the frame from left to right until your panel’s lines up.
-
Once the panels have been lined up secure the bottom left hand frame with the screws provided. After securing the bottom left side, secure the bottom right side. Check the gaps between the panels and frame and adjust accordingly with the hinge spacers provided (if needed).
Now that you have secured the top and bottom corners, and your panel operates properly, secure with the screws the middle of the bottom, top and side frames (move side frames in and out to achieve proper tolerance between panels and frame).
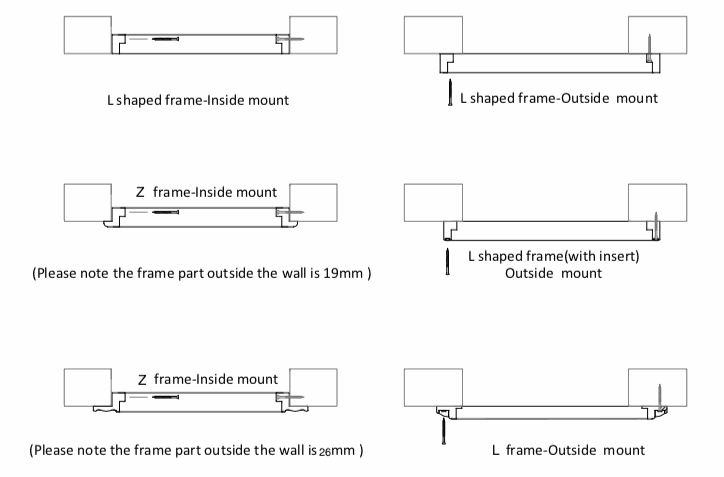
Some gaps between the shutter frame and the window frame may arise if your window is out of square, particularly on inside mount L frames. These gaps will need to be filled with white “no more gaps”.